eSIM Setting after purchase Android
TabiMoba
User Guide
(Android)
Please check before setting
- From an environment where the network is always connected eSIM Please register. (Wifi is also possible)
- Check the data switching OFF.
- From the registered email eSIM Please check the information.
- eSIM When adding the screen, such as finishing during the addition, returning the screen, executing other apps. eSIM Addition can fail. Please note that you will not be able to reset.
- eSIM If you cannot register or use it, please contact us from the inquiry form. ( eSIM Please contact us without deleting. )
*table of contents*
- eSIM addition
- Scan the QR code
- eSIM Activate
- Select the line to use
- eSIM settings of
- Japanese line setting
- eSIM Check after the setting is completed (before departure)
- eSIM Turn on the line (after arriving at the site)
- APN manual settings
- Last check!
STEP.1
eSIM addition
Settings → Connection → SIM Manager → eSIM AddBe sure to add from an environment connected to the network.

STEP.2
Scan the QR code
It can also be read from the QR code image saved in the gallery. (It may not be possible depending on the model)
STEP.3
eSIM Activate
If you close the screen (while active), the setting will be disconnected.eSIM Please note that the settings fail and cannot be redoed.
(It may take 5 to 30 minutes to complete)
* The communication company name displayed depending on the purchased product will change.

STEP.4
Select the line to use
This operation may be omitted when set in Japan (you can set it later)-
Message: Call and SMS line selection
If you set it on a Japanese line (SIM1), you can receive SMS and telephone to the Japanese phone number.
(Phone may be charged for international telephone fees when receiving calls) -
Mobile data: Select Internet connection line
When registering in Japan: SIM1 (Japanese SIM)
When registering locally: ESIM1 (Travel Moba) eSIM )
* The name of ESIM1 can be changed when the line is turned on.

STEP.5
eSIM settings of
Settings → Connection → SIM Manager → ESIM1 line is turned off
*in Japan eSIM The carrier name of Japan may be displayed when you make a setting, but it is caused by the current location information. eSIM It is not a problem.
* Some other regions corresponding to Japan eSIM Other than eSIM Cannot connect to a network in Japan.

STEP.6
Japanese line setting
Settings → Connection → International Raming → Data Roming ON
*abroad eSIM OFF data roaming when local network products

STEP.7
eSIM Check after the setting is completed (before departure)
- SIM1: Line ON
- ESIM1: line off

--------------------------
STEP.1
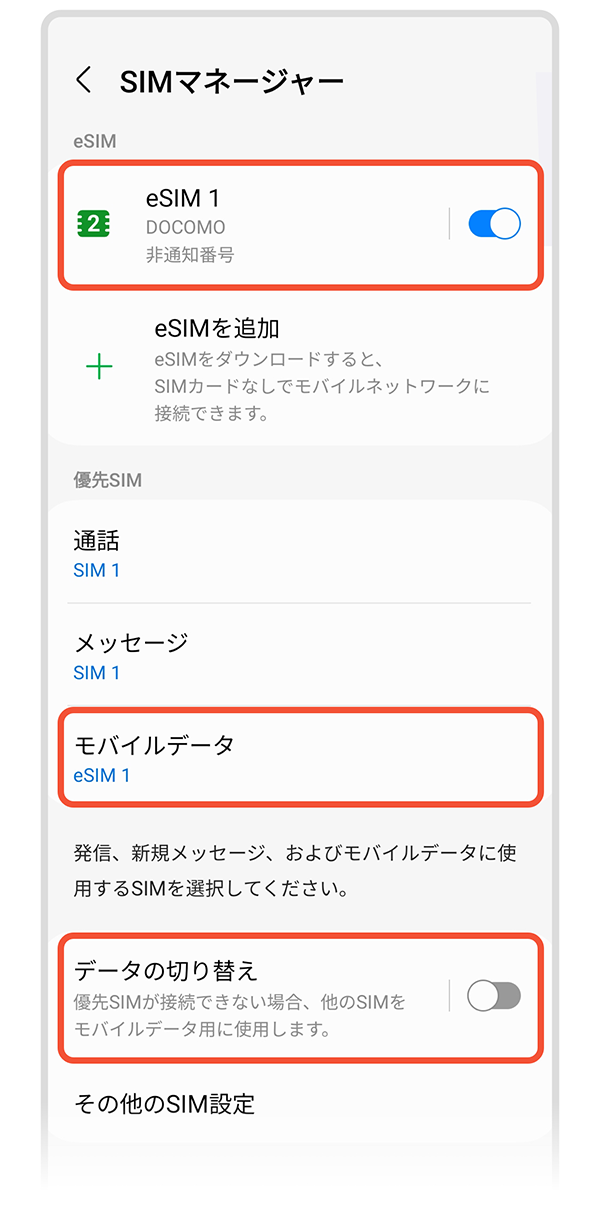
eSIM Turn on the line
- Setting → Connection → SIM Manager → SIM1 is turned off, eSIM ON
- Settings → Connection → SIM Manager → Changed the mobile data of the priority SIM to ESIM1
- OFF "Switching data"

STEP.2-1
APN manual settings
*Please go only if you need APN manual settings. Usually, in most cases, APN manual settings are not required.
Settings → Connection → Mobile Network → APN → Select "ESIM1" at the bottom right of the screen →: (upper right of the screen) → Initialization → Addition

STEP.2-2
APN editing
Enter name, APN, user noodles, password →: (upper right of the screen) → Save → restart the terminal
* APN information is usually not input. If you need to enter APN information, please contact us separately.

STEP.3
Last check!
- eSIM → Turn on the line
- Mobile data → Select ESIM1
* If you need SMS reception or telephone reception with a Japanese phone number, turn on SIM1 line and set the priority SIM to SIM1.
(Phone may be charged for international telephone fees when receiving calls)


